How to Calculate Channel Coil Cost on Channel Letters
You know roughly what you spend per job because you've been doing this long enough. But if someone asked you to show the exact coil cost broken down letter by letter? You'd be guessing. Most shops are.
I admitted to my wife the other day that I don't truly know the bill of materials on most of my projects. She gasped.
The reality is this — I have a decent idea on substrates. I can nest the objects on a canvas and get an approximation of how much sheet material I'm using. But coil? Returns? Forget about it. I know roughly what I'm spending per job because I've been doing this for 20+ years. But if you asked me to show you the exact coil cost broken down letter by letter? I'd be guessing. And I'd bet most shops are in the same boat.
That's the dirty little secret of channel letter fabrication. We price by the inch, we mark up from experience, and we hope the margins work out. Most of the time they do. Sometimes they don't — and we don't even know which jobs burned us.
So I started asking myself: how would you actually calculate the coil cost on a set of channel letters? Here's what that process looks like.
What You Need to Know First
To figure out how much coil a single letter requires, you need one critical number: the total perimeter length of that letter. Not the height. Not the width. The actual measured path around every edge of the letterform.
And here's where it gets tricky — you can't eyeball that number. You need software.
Whether you're using CAD, a DXF viewer, or some other design tool, you have to trace or measure the full perimeter of the letter profile to get an accurate length. For a simple letter like “C” or “L,” that's straightforward enough. But the moment you get into letters with more complex geometry — think “S,” “G,” or anything with serifs — the perimeter gets longer than most people assume.
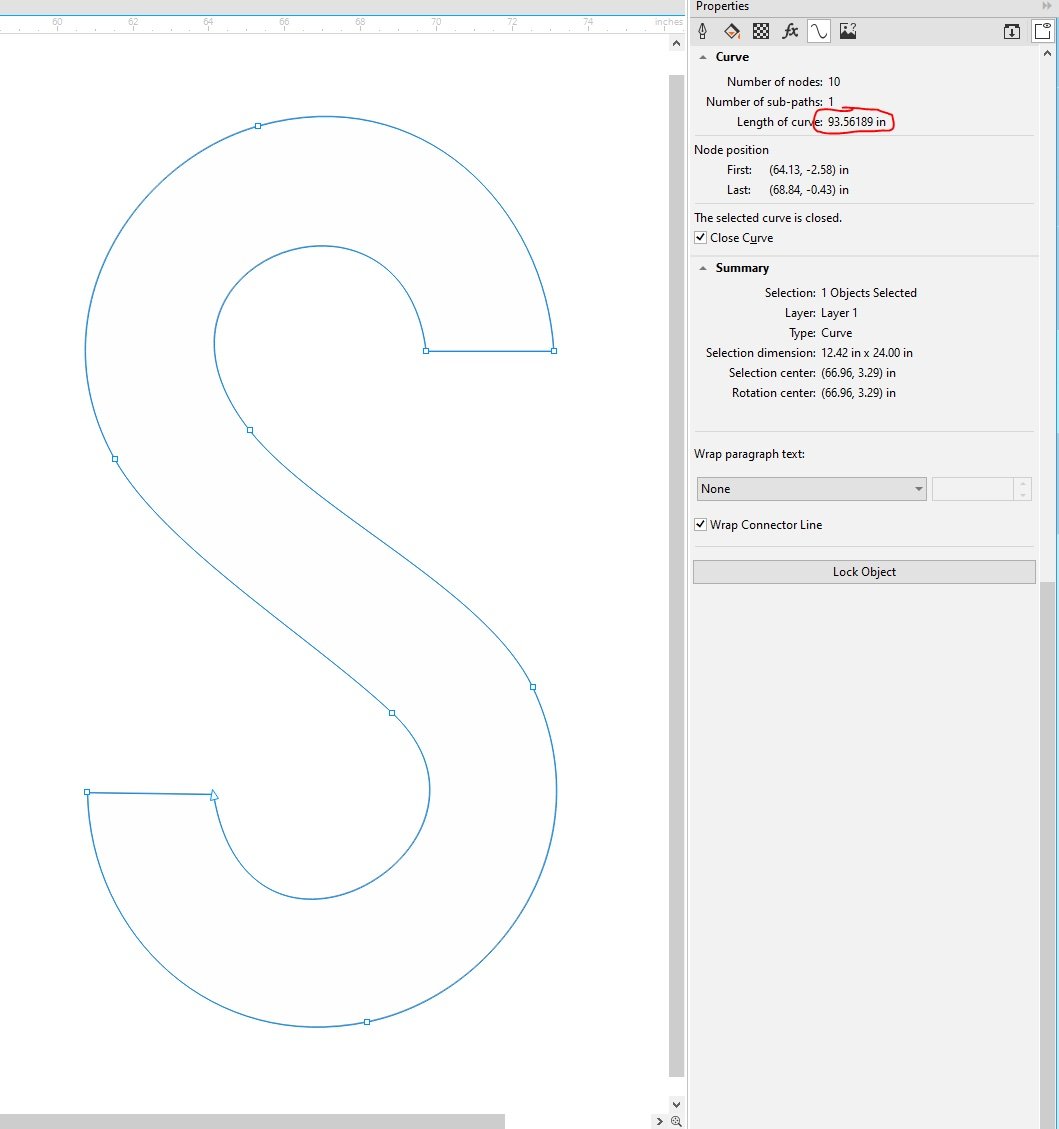
A 24" tall “S” measured in CorelDRAW — 93.56 inches of perimeter. That's almost 8 feet of coil for one letter. You're not eyeballing that number.
Once you have the perimeter length of a letter, you know how much coil that letter is going to consume.
The Basic Formula
Here's how it works:
- Get the total length of your coil roll. Your supplier sells coil in rolls — typically around 150 feet of aluminum at a given depth and gauge. You know what you paid for that roll.
- Calculate your cost per linear foot (or inch). Take the total cost of the coil and divide it by the total length of the roll. That gives you a unit cost — your cost per foot or per inch of return material.
- Multiply by the letter's perimeter. Take that unit cost and multiply it by the perimeter length of the letter. That's your channel coil cost for that one letter.
Channel coil is aluminum, typically either .032 or .040 gauge, and comes in rolls of around 150 feet. It's available in multiple widths, but 5 inches is the most common — that's your standard return depth for most channel letter sets. A roll of black or white runs about $300 right now. Colors will cost you more.
Example:
A 150 ft roll of 5" .040 white aluminum coil at $300.
Cost per foot: $300 ÷ 150 = $2.00 per linear foot
Your letter “B” has a total perimeter of 42 inches (3.5 feet).
Coil cost for that letter: 3.5 × $2.00 = $7.00
Simple enough for one letter. But hold that thought.
Don't Forget the Islands
Now here's what catches people. Letters like A, B, D, O, P, Q, R — any letter with an enclosed counter (the hole inside the letter) — have islands. That island is a separate piece of coil. It has its own perimeter, its own bends, and it needs its own return material.
So for a letter like “A,” you're not just measuring the outside perimeter. You're also measuring the perimeter of the triangular cutout inside. That's a second piece of coil that has to be formed separately.
The same concept applies to the letter “B” — it has two islands. “D” and “O” each have one. You have to account for every single one.
The calculation is the same — measure the island perimeter, multiply by your cost per foot — but you have to remember to do it. Miss the islands on a set of letters and your quote is short before you even start fabricating.
Now Do It for Every Letter on the Job
Here's where the real pain kicks in.
That formula above? You have to repeat it for every single letter and shape on the proposal. A typical storefront sign might have 8 to 16 characters. And each letter has a different perimeter. Each one might have islands. Each one needs to be measured individually.
So now you're opening each letter in your software, measuring the perimeter, writing it down, checking for islands, measuring those, running the math, moving on to the next letter. One by one. Character by character.
For a 20-letter sign, you might spend 30 to 45 minutes just on coil calculations — and that's only one material. You still have faces, trim cap, backer, LEDs, and everything else to figure out.
Multiply that across two or four proposals a day, not to mention client ordered resizing! And then you start to see how much time gets buried in math that should be automatic.
There's a Faster Way
This is exactly the problem SignCrunch was built to solve — by a fabricator, for fabricators.
Drop your DXF file into the app, and it calculates the channel coil cost for every letter instantly. Every perimeter is measured down to the curve. Every island is detected and accounted for automatically. But coil is just the beginning.
SignCrunch calculates your complete channel letter bill of materials from a single DXF: acrylic faces, trim cap, channel coil, vinyl, digital print, background panels, raceway, and LED modules — across 6 sign types including front-lit, halo, and cloud configurations. You can assign face and return materials per letter and see a full cost breakdown for every object in your file.
You set your own material parameters — your coil price per roll, your sheet costs, your LED module pricing — so every calculation reflects what you actually pay, not an industry average. Client wants to resize? Drop the updated DXF and every material reprices in seconds.
No more measuring perimeters letter by letter. No more spreadsheets. No more forgetting an island on a “B” and eating the margin. No more quoting blind on a set of channel letters and hoping your per-inch number covers it.
One file. Every material. Every letter. Your real numbers.
Start calculating your true channel letter material costs.
Try SignCrunch free for 7 days — drop a DXF and see exact coil costs for every letter in seconds. No more guessing.
Next in the series: How to Calculate Trim Cap Cost on Channel Letters
Won Lee
Founder of SignCrunch. 20+ years in channel letter fabrication. Building tools to help sign shops know their real costs.