Tutorial
SignCrunch Tutorial
Complete guide to calculating your channel letter material costs
Contents
1. Preparing Your DXF File2. Uploading & First Look3. Vendor Prices, LEDs & Raceway4. Canvas Overview5. Reading the Cost Breakdown6. Understanding the Object List7. Client Pricing8. Saving, Loading & Exporting9. Keyboard Shortcuts10. Pro Tips1. Preparing Your DXF File
Before uploading to SignCrunch, your DXF file needs to be set up correctly. The quality of your results depends entirely on the quality of your input file.
What to include
Your DXF should contain only the sign letters at actual scale. Each letter should be a separate closed path (or set of paths for letters with islands like O, A, B, D, R, P, etc.).
What to remove
Before exporting your DXF, remove everything that is not part of the actual channel letter set: dimension notations, text annotations, border frames, page layouts, raceway lines, registration marks, logos, and guides. These extra objects will be read as paths and will throw off your calculations.
Supported software
Your DXF can come from any sign design software: CADlink, FlexiSign, SignLab, Adobe Illustrator, CorelDRAW, or any CAD program that exports DXF.
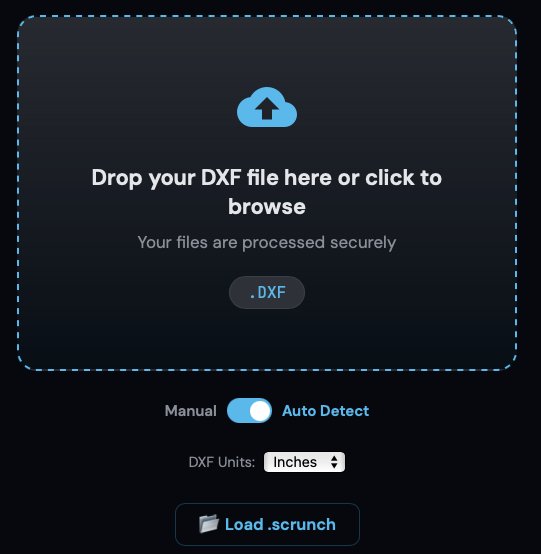
2. Uploading & First Look
3. Setting Your Vendor Prices, LED Settings & Raceway Sizing
Raw Pricing tab
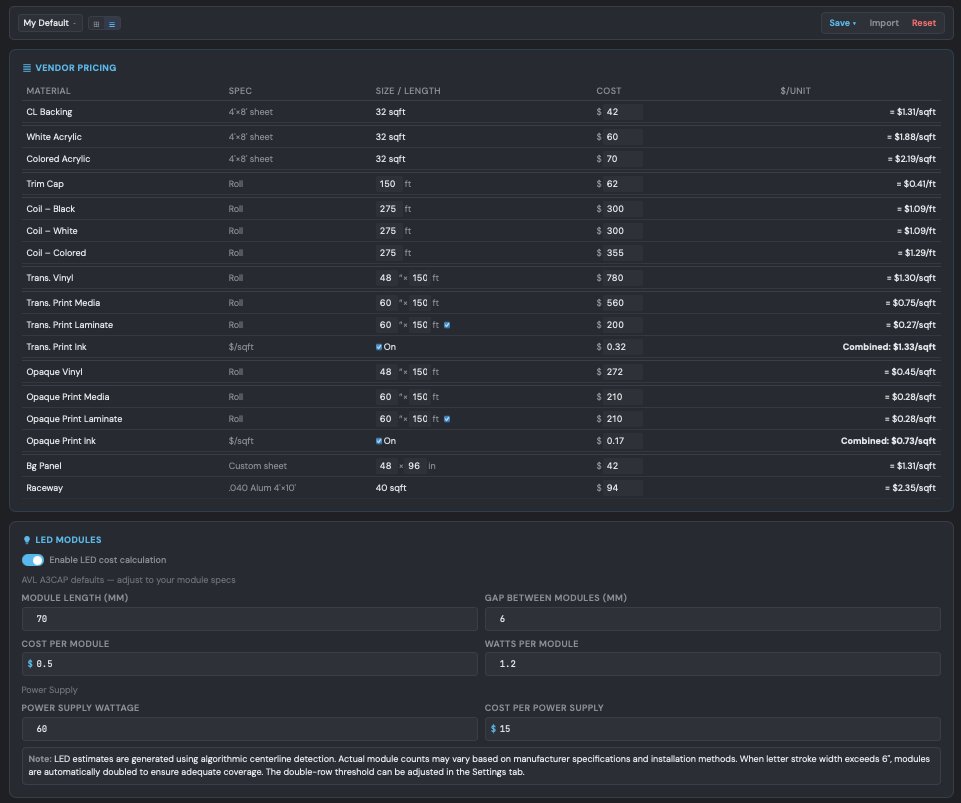
Click the Raw Pricing tab to enter your actual vendor costs. Every material cost calculation in the app is driven by these prices. Each material shows the base cost (e.g., cost per 4×8 sheet) and the calculated per-unit price (e.g., $/sqft).
Price libraries
Save — saves current prices to the active library. These auto-load every session.
Save As — creates a new named library from your current prices.
Export — downloads a .scrunch-prices file. Back up your pricing or share with colleagues.
Import — loads a .scrunch-prices file from disk.
Reset — reverts to SignCrunch factory defaults.
LED settings
Toggle the LED Module section in Raw Pricing to configure LED parameters. SignCrunch uses a proprietary centerline algorithm to determine the actual path LEDs follow inside each letter — not just the perimeter. This gives you accurate module counts, total wattage, and power supplies needed.
Module spacing — distance between LED modules (default 6 inches).
Cost per module — your vendor price per LED module.
Watts per module — power draw per module for supply calculation.
Power supply wattage — capacity of each power supply unit.
Power supply cost — your vendor price per power supply.
For halo-lit and front+halo sign types, halo LEDs are calculated separately along the backside perimeter at 2 modules per foot.
Raceway sizing
The raceway section shows the total width of your letter set, cross-section size (field-measured at 29 inches), and total square footage of .040 aluminum needed. For multi-line signs, each line gets its own raceway measurement.
4. Canvas Overview
The canvas is your workspace. After loading a DXF, your sign letters appear here color-coded by type. Double-click the canvas to enter fullscreen mode for a larger workspace — double-click again or press Esc to exit.
Sign type color key
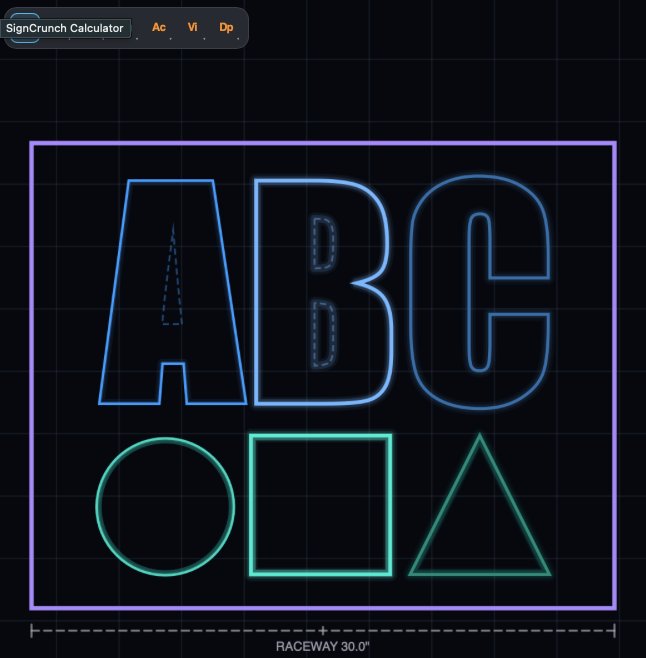
Each sign type has a distinct color on the canvas so you can quickly verify assignments at a glance. Lighting glow effects (inner glow for front-lit, outer glow for halo) can be toggled on or off in Settings.
Tool toolbar
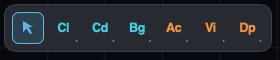
The vertical toolbar on the left side of the canvas contains your assignment tools. Click a tool, then click objects on the canvas to assign them. The active tool highlights in the toolbar.
V Pick — default selection tool. Click objects to select, view details, and navigate the canvas.
Cl Channel Letter — assigns channel letter types. Click the dropdown for sub-types: Standard (front-lit only), Front+Halo (front and back lit), or Halo Only (backside lighting only, no face LEDs).
Cd Cloud — assigns cloud (cabinet-style) channel letter types. Same sub-types as channel letters: Standard, Front+Halo, and Halo Only. Cloud letters use area-based LED fill instead of centerline.
Bg Background Panel — assigns ACM background panels. Sub-types: Standard (no lighting) or Halo-Lit (LED strip around cutout perimeters).
Ac Acrylic — switches acrylic face material. Sub-types: White (default) or Color (uses separate colored acrylic vendor price).
Vi Vinyl — applies vinyl overlays to faces. Sub-types: Translucent or Opaque.
Dp Digital Print — applies digital print overlays. Sub-types: Translucent or Opaque. Digital print costs combine three components — media, laminate, and ink — each with independent pricing in Raw Pricing.
Canvas toolbar buttons

Below the canvas, you'll find these controls:
Nesting — takes you to Settings where you can enable nesting optimization per material. When enabled, SignCrunch calculates material cost from the contour area (polygon outline) instead of the bounding box — more accurate for CNC-routed materials like acrylic and ACM.
⊞ Raceway — enters custom raceway drawing mode. Click two points on the canvas to measure an exact raceway length. You can draw multiple raceways for complex sign layouts. Set the Raceway dropdown to "Custom" to use your drawn measurements instead of the automatic calculation.
Measure Stroke — click two points across a letter's stroke to measure its width. This determines whether the LED calculation uses single row (under 6 inches) or double row (6 inches and above) modules.
File bar
The bar at the bottom of the canvas shows your filename and quick settings:
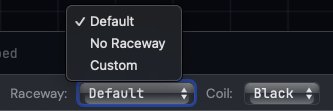
Raceway dropdown — Default (auto-calculated single or multi-line), No Raceway, or Custom (use your drawn measurements).
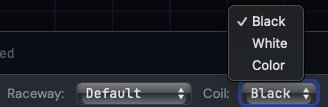
Coil dropdown — Black, White, or Color. Each uses its own vendor price from Raw Pricing.
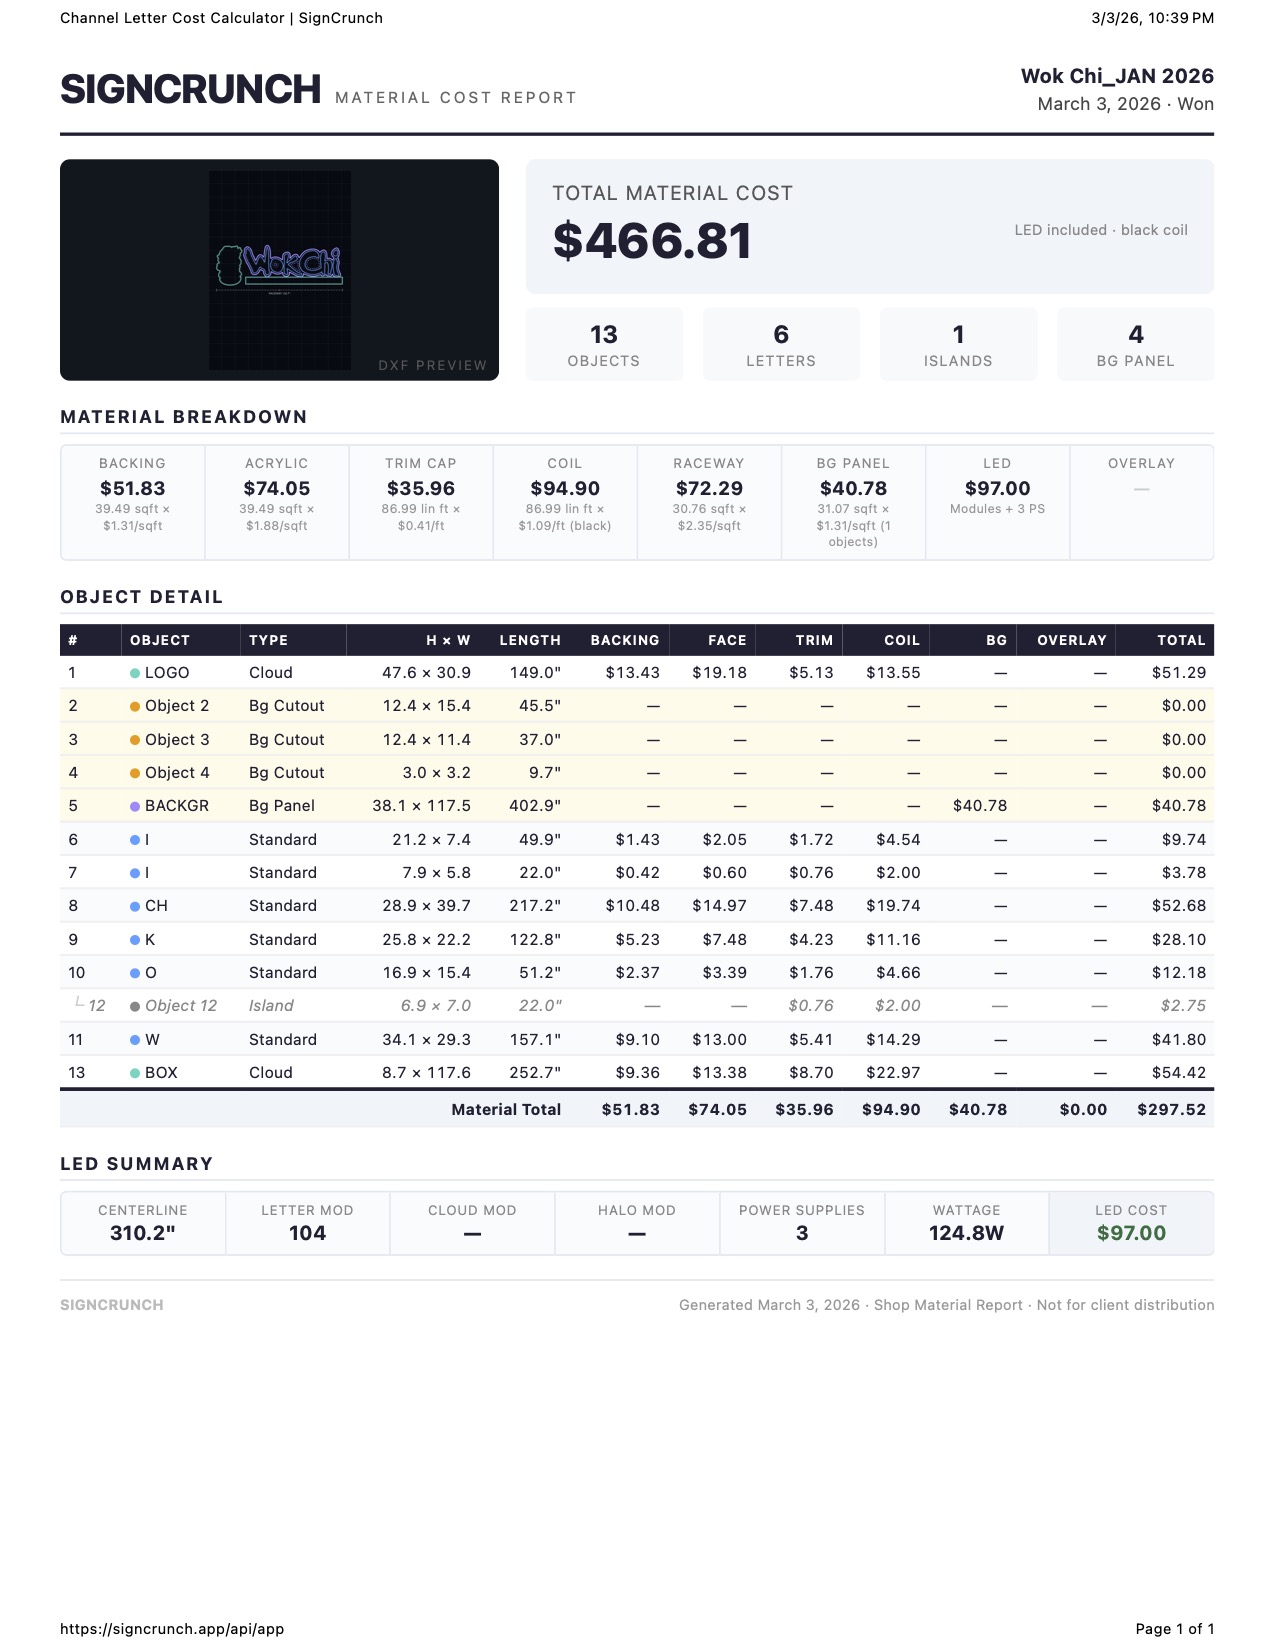
5. Reading the Cost Breakdown
The material cost total

The big number at the top of the right panel — this is the sum of all material costs for your entire sign set. This is your floor: the absolute minimum cost of raw materials before labor, overhead, or profit. Everything you quote above this number is margin you're choosing, not guessing.
Material cards

Below the total, you'll see the material breakdown cards — one for each material category: CL Back (backing), Acrylic Face, Trim Cap, Channel Coil, LEDs, Background Panel, overlays, and Raceway. Each card shows the total cost, quantity used, and per-unit price.
Click any material card to highlight exactly which objects on the canvas are contributing to that material cost. This makes it easy to visually verify what's being priced and catch any misassignments.
Margin bar

Below the total, the margin bar shows your cost vs. sell price at a glance. As you set client pricing, the bar fills to show your profit margin percentage — giving you immediate visibility into how much room you have above the material floor.
6. Understanding the Object List
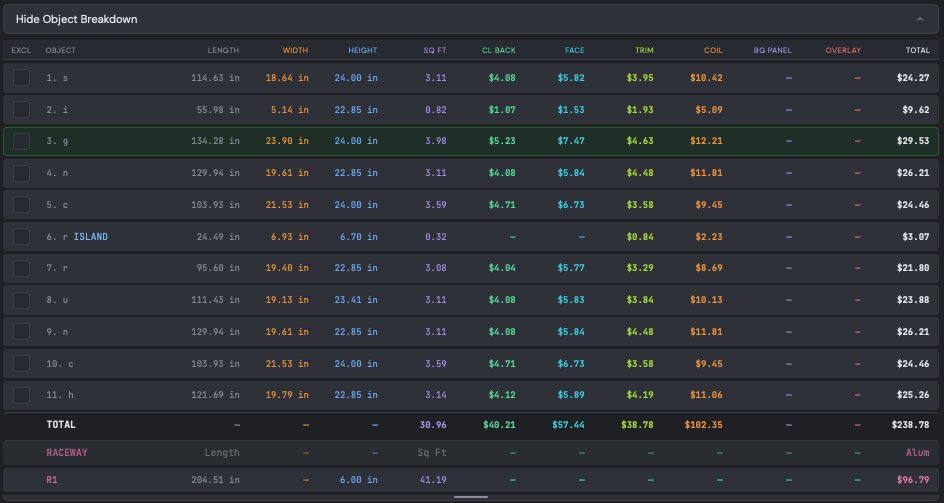
Below the material cards, the object breakdown table lists every path SignCrunch detected in your DXF along with its technical measurements and per-material costs.
What each row shows
Each object displays its perimeter length, width, height, and square footage. To the right, you'll see the individual cost for each material assigned to that object — backing, face, trim, coil, overlay, and panel. The total at the end of each row is that object's complete material cost. A totals row at the bottom sums all columns.
Renaming objects
Double-click any object name to rename it. This is useful for labeling letters (e.g., "S", "I", "G", "N") or identifying specific components. Names are saved with your .scrunch project file.
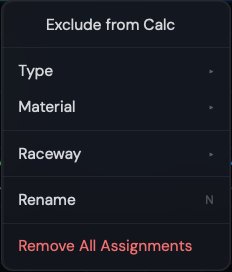
Excluding objects
Use the checkbox in the Excl column to exclude objects you don't want calculated — registration marks, logos, or anything that isn't part of the sign. Excluded objects are grayed out on the canvas and removed from all material calculations.
Canvas interaction
Click any object in the table to highlight it on the canvas, or click a path on the canvas to highlight it in the table. This two-way linking makes it easy to identify which path corresponds to which letter.
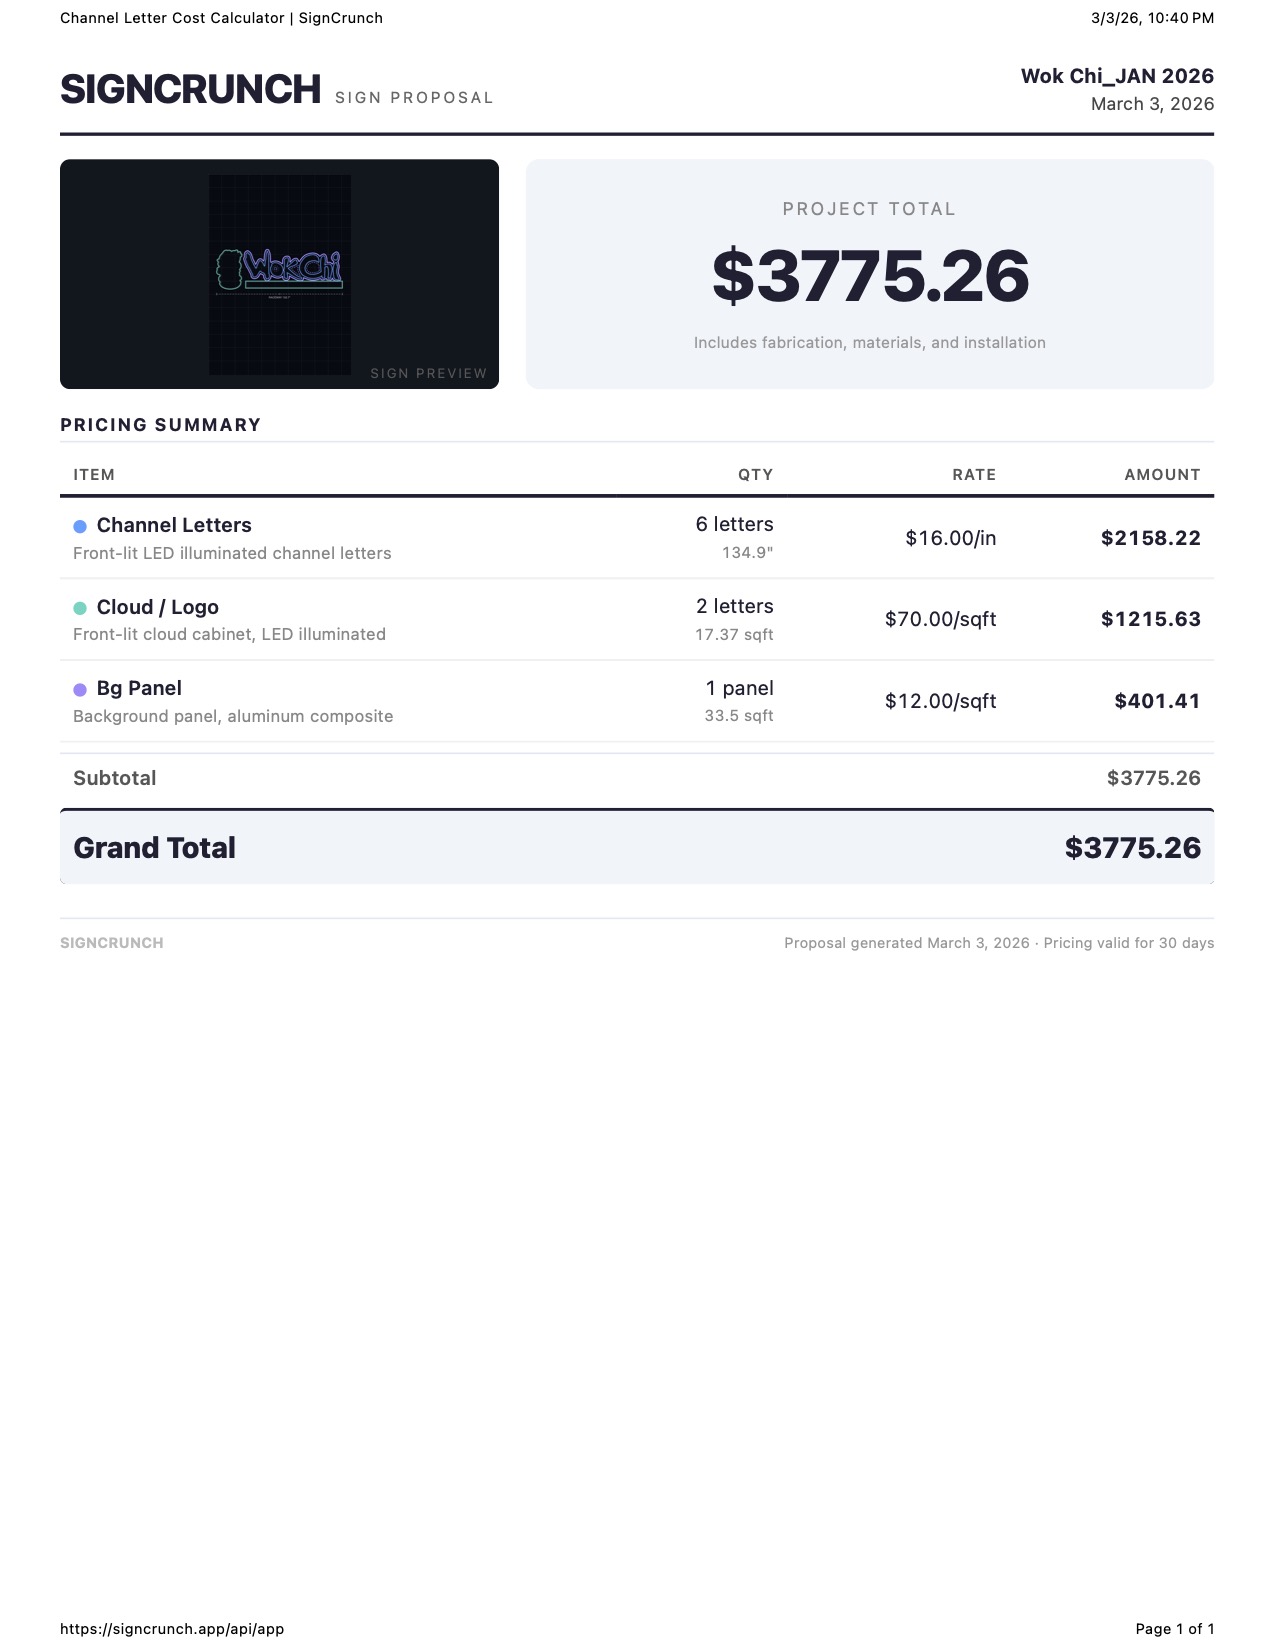
7. Client Pricing
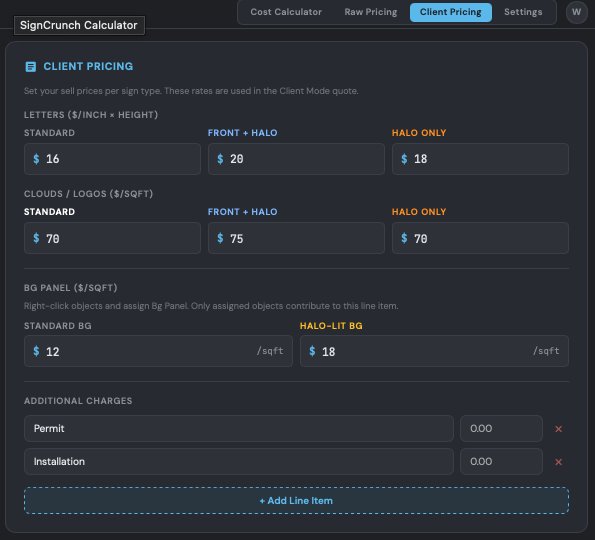
Click the Client Pricing tab to set your sell rates for customer proposals. This is where your material cost floor turns into a quoted price.
Per-inch and per-sqft rates
Set your sell price for each sign type. Channel letters use per-inch pricing (based on letter height), and cloud/cabinet letters use per-square-foot pricing. Each lighting style has its own rate:
Standard $/inch — front-lit channel letters.
Front+Halo $/inch — front and halo lit.
Halo Only $/inch — backside lighting only.
Cloud $/sqft — standard cloud cabinets.
Cloud F+H $/sqft — cloud with front and halo.
Cloud Halo $/sqft — cloud halo only.
ACM Background — per-panel pricing for standard and halo-lit background panels.
Additional charges (custom line items)
Below the per-inch rates, you can add custom line items for anything beyond the sign itself — permits, installation, electrical, engineering, shipping, or any other charge. Click + Add Line Item to add a new row. Each row has a name and dollar amount. These appear on the client print template and are included in the grand total.
Shop vs. Client mode
On the Cost Calculator tab, use the Shop / Client toggle at the top of the right panel to switch views. Shop mode shows your raw material costs (internal). Client mode shows the sell price, profit, and margin based on your per-inch rates — this is what drives the client print template.
8. Saving, Loading & Exporting
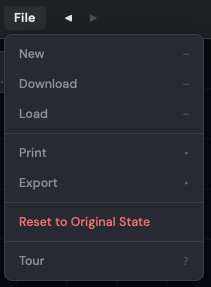
All file operations are in the File menu (top-left of the calculator).
Download project (.scrunch)
Downloads a .scrunch project file to your computer containing your DXF data, all material assignments, excluded paths, vendor prices, client rates, custom line items, and every setting. Load it later to resume exactly where you left off.
Load project
Open a previously saved .scrunch file. All assignments, prices, and settings are restored — you pick up right where you stopped.
New
Clears the current project and returns to the upload screen so you can load a new DXF. If you have unsaved work, you'll be warned before clearing.
Export CSV
Exports your cost breakdown as a CSV for Excel or Google Sheets. Choose between Shop CSV (full material detail) or Client CSV (sell prices only). QuickBooks export is also available.
Print templates
Shop print — full material breakdown with DXF preview, per-letter cost table with all material columns, category totals, and LED summary. This is your internal cost reference.
Client print — clean proposal showing your per-inch sell prices, line items, custom charges, and grand total. Material costs stay hidden — only the sell price is visible to the customer.
9. Keyboard Shortcuts
SignCrunch has keyboard shortcuts for fast access to tools, tabs, and actions. These work when the canvas is active and no input field is focused.
Navigation
1 Cost Calculator tab
2 Raw Pricing tab
3 Client Pricing tab
4 Settings tab
F Toggle fullscreen canvas
Tools
V Pick tool (selection)
C Channel Letter — then S Standard, F Front+Halo, H Halo Only
D Cloud — then S Standard, F Front+Halo, H Halo Only
B Background Panel — then G Standard, H Halo-Lit
A Acrylic — then W White, C Color
I Vinyl — then T Translucent, O Opaque
P Digital Print — then T Translucent, O Opaque
Canvas actions
R Enter custom raceway drawing mode
Z Measure stroke width
N Rename selected or hovered object
Enter Finish current tool action (raceway, measure, assignment)
Esc Cancel current tool or exit fullscreen
Ctrl+Z Undo
Ctrl+Shift+Z Redo